
Compton Wood Flooring installs engineered hardwood flooring in homes across Compton, CA, serving surrounding cities including East Rancho Dominguez, Willowbrook, West Rancho Dominguez, Lynwood and Watts, with more than 20 years of hardwood experience behind every job. Engineered wood is often the best choice for the slab-on-grade houses and additions found around Compton, because it tolerates the moisture a concrete floor gives off far better than solid strip flooring. We test that concrete before recommending any product.
Not every engineered floor is equal. The wear layer, the core, the finish and the way the boards are fastened all decide how the floor looks in ten years and whether it can ever be sanded. We explain those differences with real samples on the estimate visit, rather than steering you toward whatever a supplier has in stock that week.
On raised-foundation houses, engineered flooring can also go over the original subfloor after we have checked the framing and flattened any low spots. That makes it a good fit for replacing old carpet or vinyl without the thickness of a solid wood install.
How Engineered Hardwood Is Built
The Wear Layer on Top
The wear layer is the slice of real hardwood on the surface of each board. It decides what the floor looks like and, just as important, how many times it can be sanded later. A thin wear layer limits you to screening and recoating, while a thicker one can be fully sanded and restained years from now.
We treat wear layer thickness as a long-term cost question, not a spec-sheet detail. A cheaper product with a thin wear layer may need to be replaced when the finish wears through, while a better one can be refinished like solid wood.
Engineered Core Construction
Under the wear layer is the core. Multi-ply plywood cores stack thin layers of wood with the grain running in alternating directions, which resists the swelling and shrinking that makes solid boards cup. Other products use a high-density fiberboard core that is flatter but less forgiving if it gets wet.
Core construction is why engineered wood can go over concrete and in rooms where solid wood would struggle. We match the core to where the floor is going, since a kitchen next to a dishwasher needs different tolerance than a bedroom.
Formaldehyde Limits and Product Labels
Hardwood plywood used in engineered flooring sold in California must meet CARB Phase 2 formaldehyde limits under 17 CCR 93120.2, and TSCA Title VI applies the same kind of limits nationally. We check the label on every product before it is ordered, and we steer away from imports that cannot show compliance.
Engineered Wood Over Concrete Slabs
Slab Moisture Testing Before We Order
Concrete slabs release moisture, and a floor installed on a wet slab will cup, lose adhesion or grow mold under the boards. We test with an ASTM F2170 in-situ relative humidity test, which reads moisture inside the slab, or a calcium chloride moisture test at the surface. Every reading is written down with its location and date.
Those numbers go against the flooring and adhesive manufacturers’ published limits. If the slab is too wet, we talk about a moisture-mitigating adhesive or a vapor retarder system before anything is installed, rather than hoping it dries out after.
Glue-Down Installation on a Slab
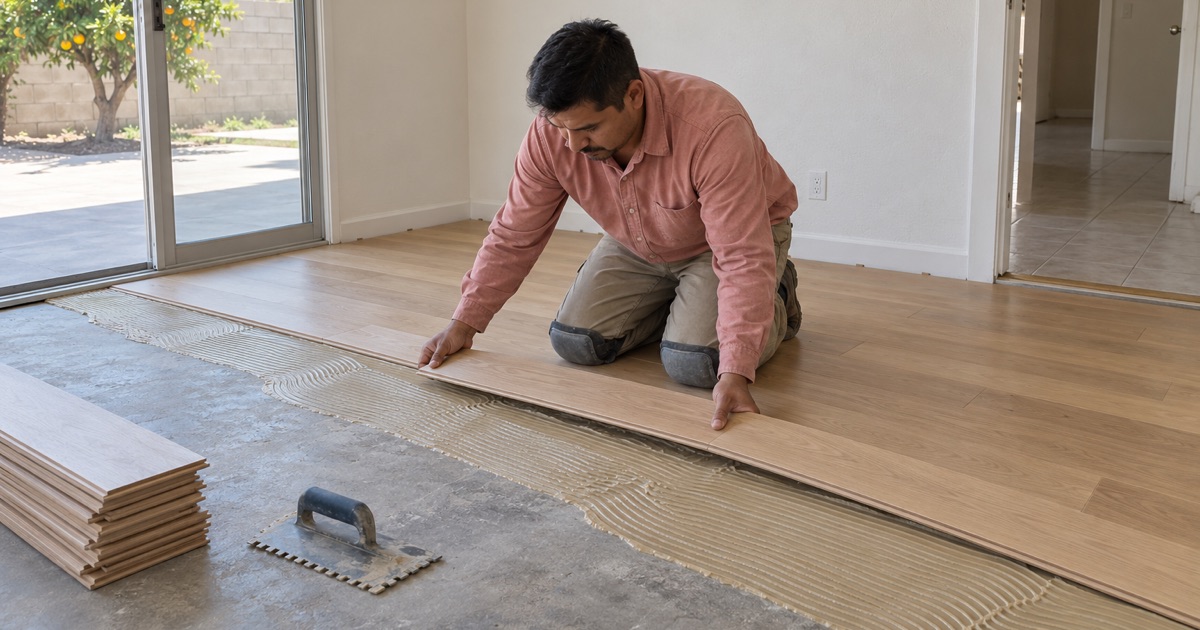
Glue-down installation bonds each board to the concrete with a flooring adhesive, giving a solid feel and little hollow sound. It needs a flat, clean slab, so we grind high spots and fill low ones before spreading any glue. Adhesive coverage is checked as we go, since a board that did not bond well is the one that will click underfoot.
The adhesive matters as much as the boards. Many flooring adhesives double as a moisture barrier when spread at the right trowel size, and some carry VOC limits of their own under South Coast air rules. We use the adhesive the flooring manufacturer names in its warranty, because a mismatched glue is one of the first things a warranty claim gets denied over.
Floating Floors Over Concrete
A floating installation locks the boards together over an underlayment and a vapor retarder, without fastening them to the slab. It works well over older slabs with old adhesive residue or minor unevenness. We leave the correct expansion gap at every wall and doorway, because a floating floor pinned by a tight baseboard will buckle in the first humid stretch.
Floating floors also need a flat base, typically within a tight tolerance over a few feet, or the locking joints flex and eventually separate. They are a good answer in rentals and in rooms where the floor may need to come up again, because the boards can often be removed without damaging the slab underneath.
Engineered Flooring Over Wood Subfloors
Nail-Down and Staple Installs
On a raised foundation with a plywood or board subfloor, engineered hardwood can be nailed or stapled down like solid wood. We use a cleat nail or flooring staple approved by the manufacturer, at the spacing the product calls for. Fastening to the wrong schedule is a common cause of squeaks later on.
Before any fastener goes in, we check the joists from the crawlspace where we can reach them. A new floor laid over a sagging joist or a weakened cripple wall inherits the slope, so structural problems get fixed first, and the finish floor is priced only once we know what it is sitting on.
Flattening an Old Subfloor First
Older houses in Compton often have board subfloors with humps, dips and old patches. Engineered flooring will telegraph every one of them, so we check flatness with a straightedge, plane the high spots and fill the low ones. Where the original boards are loose or damaged, we add plywood underlayment to give the new floor a sound base.
Wide Plank Engineered Floors
Wide plank flooring is one place engineered wood clearly outperforms solid. Wide solid boards move more with humidity and are prone to cupping, while an engineered plank with a cross-ply core stays flatter. If you want wide planks with visible grain, engineered is usually the stable way to get them.
Wide planks also change how a room reads. Fewer seams make a small living room feel larger, and species like white oak and hickory show long, clean grain across each board. We bring full-length samples rather than small chips, since a wide plank’s character only shows over its whole length.
Our Step-by-Step Engineered Hardwood Flooring Process
Step 1: Test the Substrate
We read moisture in the slab or subfloor, check flatness and look for any structural problems underneath. Those results decide the product, the adhesive and the installation method.
Step 2: Acclimate and Check the Wood
The flooring is delivered and left in the conditioned house as the manufacturer requires. We check its moisture content with a wood moisture meter against the subfloor readings before the first board goes down.
Step 3: Prepare and Install
We remove old flooring, prepare the substrate, then install following NWFA installation guidelines and the product’s own instructions. Transitions at doorways get reducer strips or T-molding sized to the new floor height.
Step 4: Trim and Walkthrough
We finish with shoe molding or baseboard where needed, clean up, and walk the floor with you. You get care instructions for the finish and a record of the moisture readings taken before installation.
- 20+ Years of Wood Flooring
- Written Scopes and Estimates
- Free Estimates